Saturday, 14 February 2015

Myca From The Crow Recreation Of Kristiana OneAndOnly YouTube Video.

I have always wanted to do a look from The Crow, so when I found this video made by Kristina I was so happy! So nails the look so perfectly and I think she has captured the look so well!

So here is my own attempt at the make up. I think its not that bad of a recreation. :)

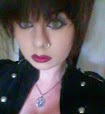
I did make adjustments because there were products she used which I didn't have. So I just made do and mend! Unfortunately I was using a foundation that was for yellow toned skin. Luckily you can't tell from the pictures,  but I do have to say I wasn't all that impressed with the product. It said lasts for 16 hours on the bottle but it really doesn't, it just goes horrible on the skin and it feels really uncomfortable to boot. Sorry Collection makeup!

I'm really keen to recreate this look again, but sadly I don't think I would be able to rock it while at work :(. I will wear it again, I will! I seriously do look this look, however, the character of Myca is creepy as hell! I'm a major fan girl of The Crow and I'm long over due in watching it..... Maybe I should do my makeup like this and watch it!?

Sorry this isn't me going through what I did, I have popped the video she made for anyone who wants to attempt this look. I just don't feel right in writing up someone else's makeup masterpiece. I will list products that I use like I usually do at the bottom of this post. 
For the outfit I  worn a simple plain black camisole, a  black corset that I brought 4 years ago off Ebay. I put my military jacket over  the top and corset. on my bottom half I worn pleather shorts  with tights and platform heels. If I do this look again I'll take a picture of the outfit and pop it in this post :)


Products I used to recreate this look:- 
                                      * L'Oreal Colour Correcting Primer.
                                      * Collection Foundation in Porcelain.
                                      * Random eyeshadow palette for blush contour and eyes.
                                      *Barry M lipstick 160.
                                      *Collection Gothic Glam Lipstick Scorned 2.  
                                      *Kohl Black Pencil Eyeliner.
                                      * Rimmel Scandeleyes Eyeliner- Black.
                                      * Rimmel Scandeleyes Retro Mascara- Black.
                                      *Natural Collection Mascara Clear (Brow Gel).


Zombie Cut Throat Witch.


Here's other Halloween look I came up with from last Halloween. 

I was going for a dead pirate zombie, but it ended up being a zombie witch! Which I didn't mind haha!

I applied my colour correcting primer to my face- it is important for this look to look as pale and dead as possible! :P I applied my foundation and then set it with press powder. I begin contouring in all the usual places such as jaw line, nose, around the forehead and the cheek bones I achieved this by using a light brown matt eyeshadow. You want it to look sharp and striking so contour away!

Next we move on to the eyes. The colours that I used were a mixture of gray, black and lilacs blended together. I blended it out from the crease to just above the brow bone. You want to bring the blending down to where eye bags will be to accentuate them. Basically your going for a punched in the eye look! I didn't do any line for this and just applied mascara to my upper and lower lashes.

For the eyebrows I took my clear mascara and went over my eyebrows to keep them in place and shape them. I applied Black eyeshadow and shaped the brow even more. I feel that I should have made them lighter, as they are a bit to alive looking!
Now we go onto the lips which I used a gray eyeshadow, its as simple as that! If I went out I would have probably have tried to find a lipstick that was similar, but this worked! I then used a mixture of different eyeshadows (I think they were the same ones as I used for the eyes, but don't quote me on that!) to go around the mouth.

Onto the fun bit! Creating scabs and that slit throat look.

For the scabs I simply used Eyelure lash glue as it is Latex based I got a while back. I applied this to where I wanted it, got some tissue tore up a small piece and placed it where I wanted it to be and applied the latex over the top. Repeat until you get the desired effect. Let it set, once it is set you can then apply the same colours used for around the mouth, also apply this to different areas of your face to create bruising. You also want to apply a bit of red to the "scabs".

For the slit throat I went and lined the outline of the slit with purple, gray, black and red first and then applied latex and shaped some cotton wool into a worm shape to go across my throat, but make sure you create a gap in the middle of where the slit will be. You want to continue applying the latex to the cotton as you go to secure it in place. Once you have the mishmash of cotton and latex on your neck, you want to grab some tissue rip off pieces of tissue apply it to the cotton wool and stick down with latex. Wait for this to dry, which if I remember correctly was about 10-15 minutes. Once dry, you can go wild with red eyeshadow and then fake blood!

Applying the fake blood to the throat:- You want to apply it to the gap you left (this is why it is important to make a gap!) and let it drip down your neck and that's the throat slit finished! 

To complete this look I added stitched using black eyeliner and a bit of red shadow. If it wasn't for it being a Halloween look, I'd have probably have found a product that was more realistic.


Finshing touches:- For my hair, I used a mixture of dry shampoo sprayed close to my hair to get it to go white and talcum powder. Put on your witches hat and your good to go! I decided to wear a black peplum dress, milltary jacket, tights and boots. 

FYI be warned! Fake blood does get into your hair and you will feel like your hair has decided it wants to be one with the fake blood! Not a great feeling, but it was worth it haha


Products used:-    * L'Oreal colour correcting primer.
                              * Barry M foundation in Ivory.
                              * Eyeshadows from a random palette.
                              * Urban Decay Naked Palette Naked (contour).
                              * Eyelure Lash Fix Glue.
                              * Cotton Wool.
                              * Tissue.
                              * Fake Blood brought at Tesco.
                              * MUA Eyeliner- Black.
                              * Rimmel Scandaleyes Mascara- Black.
                              * Natural Collection Clear Mascara.

DIY Gothic Patent Boots And Heels.

So, I made these DIY boots and patent heels a while back, they are really simple and add a nice personal touch to old boots or shoes that are starting to look a bit sad for themselves! 

To start off with, you need a pair of boots. (or any type of shoes you would like to goth up) and some paint colour of your choosing. I choose white for my shoes. I would proberbly change the type of paint I used, as I only had a tester tub of sample wall paint to hand. (or rather laying about my flat!) 

I decided that for my heels I wanted to put a spiderweb design on the back of them, I saw this design on a shoe from Tumblr, but I don't know/couldn't afford them at the time, so I decided to just do it myself! For my boots, I wanted to have the spider web design again, and I also wanted to put the Type O Negative logo on the side of one of them and on the other boot  I wanted to have a bat with "Batgirl" written underneath it. 


Picture Found Here.

If you are not so confident/ lazy to just go in freehand, then use a marker pen to sketch out the design before going in with the paint. 

I decided to do it freehand, mainly because I am lazy! I begin the heels first by making three lines. (One going down the back of the shoe and a then a line on either side) I then added in mores and started doing the curved join up lines for the spiderwebs. And that's the High heels done!

For the boots, I did the same this for the spiderwebs as I did with the heels. I then found a picture from Google of the Type O Negative logo. I started off with the Type O symbol which was surprisingly hard to do! I draw the circle and filled it in to make it thicker. I just wrote the bands name under this. Beware of wrinkled leather as it can be a bitch to paint over.

Again for the bat I looked up a picture and drew the outline and filled it in. And then just wrote "Batgirl" underneath. 

So there we are! Its easy, but it takes a steady hand to do! :)

My DIY'd Boots And Heels.


Friday, 13 February 2015

My Take On Harlequin.

This was a look that I decided I wanted to create for Halloween. I know its not Halloween any more, but it can still be used parties! 
Sorry about the picture quality!
It doesn't really show the makeup to well! :(


Okay, lets get down to the look itself! 
I begin this look by applying glue to my brows, I let the glue dry before applying other layer. Once the second layer was dry I powdered them with press powder, added other thick layer of glue, again waited for that to dry, before adding foundation over the glue.
For the rest of the face I applied my colour correction primer and then on top of that I put my foundation, which I set with my press power. (I also applied power over my eyebrows.) I also went and contoured my cheeks and under my jaw bone using a matt brown eyeshadow.
Harlequin is so badass!
For the illusion of the mask, I outlined the shape of it with liquid eyeliner. To fill it in, (apart from the eyelids, we'll come back to the lids later!) I used a mixture of black eyeshadow and liner, as the eyeshadow was still not as black as I wanted it to be!

Now we can move onto the eyelids, for this I just used a pearl white eyeshadow, it doesn't have to be a perfection application as I think Harlequin is kinda unhinged and crazy! I applied liner to my upper lash line to give more depth. To finish the eye part and bring it all together apply mascara. I would have loved to have added some false lashes to this look to really amp up the drama, but sadly I didn't have any, but I really feel this look would benefit from having some lashes.

For the lips, I tried to attempt a normal application, but then I realized how cool it would be if she had cartoon lips! So I went past my lipline and just thought of the lip look I wanted to obtain. I know that sounds really weird haha! I did this look last October, so you'll have to forgive me for not remembering the exact way that I created this, I hope you can kinda get what I'm meaning!

Harle Is Ready To Roll!

Products used to create this look:            
                                                                *Pritstick glue.
                                                                * L'oreal Colour Correcting Primer.
                                                                * Barry M Foundation in Ivory.
                                                                * Collection Press Powder in Ivory.
                                                                * MUA Eyeliner- Black.
                                                                * Urban Decay Naked 1 Palette- Creep.
                                                                *Urban Decay Naked 1 Palette- Naked (Contour)
                                                                 *MUA Eyeshadow White Pearl.
                                                                 * MUA Velvet Lip Lacquer In Red.